
Why We Love This Book
Chris Van Dusen’s A Camping Spree with Mr. Magee is a joyful, rhyming adventure that’s perfect for reading aloud. The bouncy text and retro-style illustrations pull you right into the story, making you feel the excitement (and slight chaos) of camping in the great outdoors. Parents will love the humor and warmth, while kids will giggle at the curious bear and the camper’s wild ride.
Beyond the laughs, this story celebrates curiosity, problem-solving, and enjoying nature. It’s a gentle introduction to the fun and unpredictability of camping, showing children that adventures—planned or unplanned—can become cherished memories. The book is also a wonderful springboard for conversations about wildlife, safety, and exploring the outdoors responsibly.
For ages 4-8.
Book Discussion
Before you dive into these fun discussion cards, snuggle up and read A Camping Spree with Mr. Magee together. The rhyming story and bright illustrations will have everyone smiling — and these questions will help you and your child laugh, imagine, and think more deeply about the adventure.
Use the printable cards to guide your conversation. You can pull them one at a time from a jar, spread them out face down to choose at random, or simply go through them in order. Either way, you’ll spark curiosity and creativity while building your child’s storytelling and critical thinking skills.
Questions:
-
How do you think Mr. Magee and Dee felt when they first set up camp?
-
Why do you think the bear wanted the marshmallows so badly?
-
What would you do if you were floating away like that?
-
Have you ever roasted marshmallows? What was your favorite part?
-
What do you think Mr. Magee learned from this camping trip?
-
What’s your favorite thing about being outside?
-
How can we watch animals safely without disturbing them?
-
What would you pack for your own camping trip?
Tip: Encourage your child to act out their answers or draw a quick doodle of what they imagine — this makes the discussion even more interactive!
A Camping Spree with Mc McGee Discussion Question Cards


Crafts
Get creative with these fun, book-inspired crafts! You can make a colorful hiking stick for your next outdoor adventure or a bear mask so you can pretend to be the curious marshmallow-loving bear from A Camping Spree with Mr. Magee.
Hiking Stick
A perfect accessory for little expl orers—decorate your own hiking stick to bring on a walk or keep as a nature-themed keepsake.
Supplies:
-
A sturdy branch from a tree or a wooden dowel
(If using a dowel, drill a small hole at the top for tying your cord.) -
Acrylic paints (your favorite colors)
-
Paintbrushes
-
Painting apron or old shirt (to protect clothes)
-
Paper plate or plastic lid (for paint)
-
Scotch tape
-
Craft feathers
-
Craft beads (any shapes, sizes, or colors)
-
Yarn, string, or macramé cord (two pieces, about 12 inches each)
Directions:
-
Paint Your Stick
Place your branch or dowel on a covered surface. Using acrylic paints, decorate it in stripes, zigzags, polka dots, or solid colors. Let dry for about 1 hour.
Tip: Acrylic paint sticks best to wood and won’t rub off easily. -
Prep Your Beading Cord
Cut a 12-inch piece of cord or string. Tie a knot at one end, then wrap tape tightly around the other end to make threading beads easier. -
String Your Decorations
Slide beads onto the cord in any order you like. Add feathers between beads or at the ends for a fun, nature-inspired look. -
Attach to Your Stick
Tie your decorated cord securely to the top of your stick. If using a dowel, thread it through the drilled hole for extra stability.
Your hiking stick is ready! Bring it along on walks to help move branches aside and add some flair to your outdoor adventures.
Bear Mask

Turn into the story’s marshmallow-loving bear with this easy and adorable mask craft.
Supplies:
-
Paper plate (sturdy, plain white)
-
Brown paint or crayons
-
Paintbrush (if painting)
-
Scissors
-
Black marker
-
Glue stick
-
Construction paper (brown, tan, and black)
-
Craft stick or elastic string (to wear the mask)
Directions:
-
Color the Bear Face
Paint or color the entire front of your paper plate brown. Let it dry if using paint. -
Cut Eye Holes
With scissors, carefully cut two circles for the eyes. Make sure they’re big enough for your child to see through. -
Add Bear Features
-
Cut out a tan oval for the bear’s muzzle and glue it to the center of the plate.
-
Cut ou
-
t a small black circle for the nose and glue it to the top of the muzzle.
-
Use the marker to draw a smiling bear mouth.
-
Cut two brown ear shapes and two smaller tan inner-ear shapes. Glue the tan pieces inside the brown ear pieces, then glue the ea
-
rs to the top of the mask.
-
-
Attach Handle or Strap
-
For a handheld mask: Glue a craft stick to the bottom back of the plate.
-
For a wearable mask: Punch a hole on each side of the plate and tie elastic string through so it fits snugly on your child’s head.
-
Now you can pretend to be the silly bear from the story—just be sure to watch out for Mr. Magee’s marshmallows!
Game
Here’s a fun way to test your child’s memory while enjoying a camping theme!
Camping Concentration Game
Make the Game
Supplies:
- Camping Concentration Game Printable
-
Glue stick
-
Scissors
-
32 seven-inch paper plates (choose colored plates for fun—yellow for one set, orange for another, etc. If you want two different games, pick two colors. For a single game, make sure all plates are the same color.)
Tip: Use paper plates only—plastic or Styrofoam plates can let the pictures show through!
Assembly Instructions:
-
Print the Pictures
Print two copies of the Camping Concentration Game printable so you’ll have matching pairs. -
Cut & Glue
Cut out each picture along the lines. Glue each picture to the middle of the “eating side” of a 7-inch paper plate. -
Dry Time
Let plates dry completely before stacking them to avoid sticking.
Now your Camping Concentration game is ready to play!
Playing the Game
Setup:
-
If your child is new to the game, start with fewer plates and build up to the full 32. Just make sure you have matching pairs!
-
Lay all plates face down on a flat surface and mix them up. Arrange them in rows:
-
Full game (32 plates): 4 rows of 8
-
Medium game (20 plates): 4 rows of 5
-
Small game (12 plates): 3 rows of 4
-
Game Play:
-
The youngest player goes first in the first game. The winner starts the next round.
-
On their turn, a player flips over two plates.
-
If the pictures match: The player keeps both plates and takes another turn.
-
If the pictures don’t match: Flip them back over to the same spot.
-
-
Play continues until all matches have been found.
Winning:
When all the plates have been matched, the player with the most pairs wins the game!

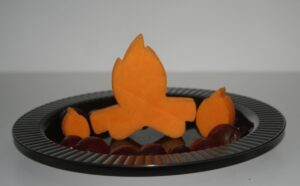
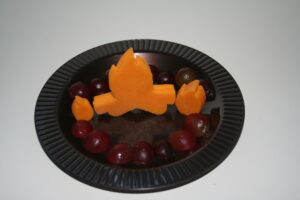
Campfire Snacks – A Tasty Treat for Your Camping Storytime!
Bring the warmth of a cozy campfire right to your table with this fun and easy snack inspired by A Camping Spree with Mr. Magee! Kids will love building their own edible “campfire,” and it’s the perfect treat to enjoy while reading or talking about your favorite camping adventures.
Supplies
-
7-inch colored paper plates – Brown works great to look like dirt or the forest floor.
-
Cheese – Use a firm sliced cheese (like cheddar, colby jack, or provolone) thick enough to cut shapes from without breaking, but thin enough for a cookie cutter to go through.
-
Thin stick pretzels – For the campfire “logs.”
-
Red seedless grapes – These make the “glowing embers” around your fire.
-
Campfire cookie cutters – I used the ones from KatoBakingSupplies on Etsy, but you can cut flames freehand with a butter knife if you don’t have a cutter.
Instructions
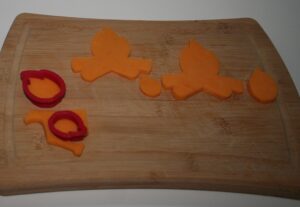
Step 1 – Make the Flames
Use the large and small campfire cookie cutters to cut flame shapes from your cheese slices.
Stand the two flame shapes together in the center of the plate so they look like a bright, glowing campfire.
(Tip: If you don’t have a cutter, freehand cut wavy flame shapes – it still looks great!)

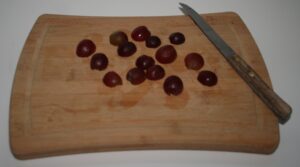
Step 2 – Add the Embers
Wash your grapes and cut them in half.
Arrange them in a ring around the edge of the plate – they’ll look like glowing, toasty embers around your fire.
Step 3 – Build the Firewood
Place pretzel sticks around the base of the cheese flames to look like logs.
Overlap them so they look like they’re stacked and ready for roasting marshmallows.
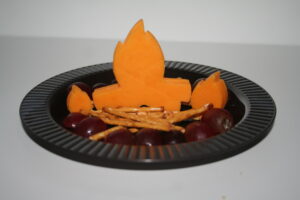
You’re Done!
Now you’ve got a snack that’s just as fun to look at as it is to eat.
Gather around, read your camping books, and enjoy your “campfire” together – no bug spray required!
Idea found at City Girls and Country Pearls
